1 – Introduction
Welcome to AvantMaker.com, your online hub dedicated to empowering makers, learners, and enthusiasts in the exciting world of IoT, DIY, and AI. We are passionate about helping you turn your innovative ideas into tangible realities. To achieve this, we offer comprehensive tutorials and development resource references, especially for the popular ESP32 microcontroller.
At AvantMaker.com, we’ve had the opportunity to work with numerous ESP32 development boards. For those eager to dive into our ESP32 tutorials, we highly recommend the following two boards. Unless explicitly stated otherwise in our guides, all our tutorials and references are primarily based on these two versatile and reliable options:
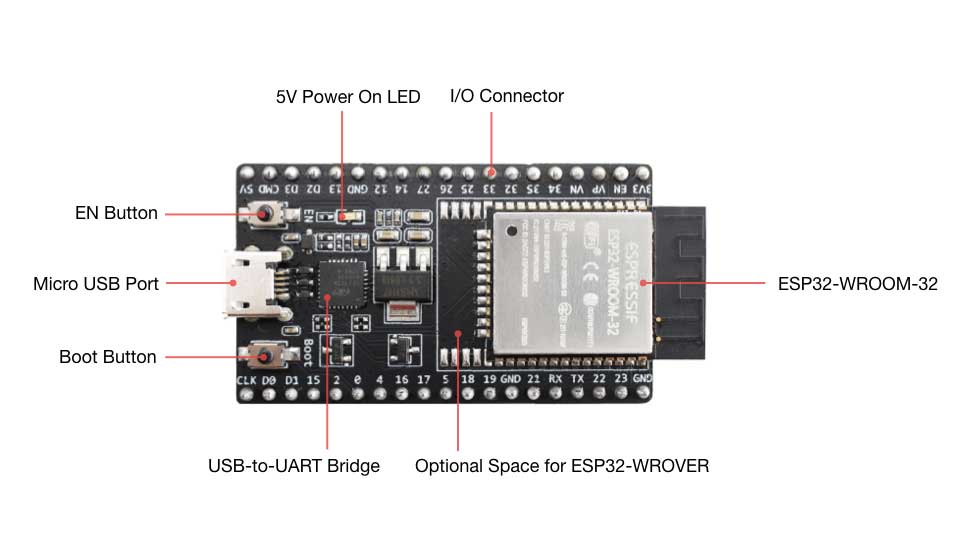
ESP32 DevKitC V4 Board
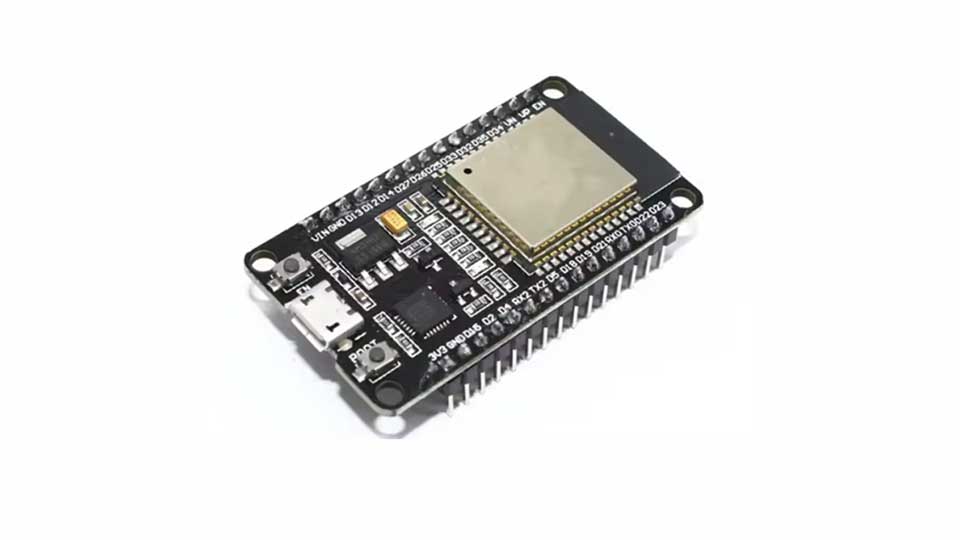
DOIT ESP32 DevKit V1 Board
2 – Why These Two Boards?
So, why did we settle on these two boards out of the many options out there? Let’s break it down.
2.1 – Beginner Friendly
Starting out with microcontrollers can feel like stepping into a maze, but these boards make it a breeze. Both the ESP32 DevKitC V4 and DOIT ESP32 DevKit V1 come packed with everything you need—Wi-Fi, Bluetooth, and plenty of pins to connect sensors, lights, or whatever else you dream up. They’re like the Swiss Army knives of development boards: simple enough for your first project, yet versatile for prototyping almost anything.
2.2 – Extensively Used by the DIY Community
These two development boards are widely adopted by the maker community, including DIY enthusiasts and learners just like you. Their popularity means you’ll find a wealth of online resources, community support, and example projects beyond what we offer at AvantMaker.com. This extensive community support can be invaluable when you encounter challenges or want to explore further.
2.3 – Easy to Find Online
No need to scour the internet or wait months for shipping from obscure corners of the world. Both the ESP32 DevKitC V4 and DOIT ESP32 DevKit V1 are readily available on major platforms like Amazon, eBay, AliExpress, and many other electronics retailers. A quick search, a couple of clicks, and they’re on their way to your workbench.
2.4 – Cost-Effective
These boards deliver top-notch features without breaking the bank. Typically, you can snag an ESP32 DevKitC V4 for around $8–$12 and a DOIT ESP32 DevKit V1 for about $7–$10, depending on the seller and shipping. Compare that to other boards that can cost $20 or more, and you’re getting a lot of bang for your buck. That extra cash can go toward sensors, LEDs, or even a coffee to fuel your next late-night build session.
2.5 – Open Source
Both the ESP32 DevKitC V4 and the DOIT ESP32 DevKit V1 are open-source hardware. This is a significant advantage for learners. Being open source means that the design files and schematics for these boards are publicly available. This transparency allows you to understand how the board is designed, how the components are connected, and even potentially modify the design for your own advanced projects in the future. It fosters a deeper understanding of the underlying hardware, which is crucial for effective learning.
2.6 – Reliable Performance
Here’s a bonus: these boards are workhorses. They’re built to handle the ESP32’s dual-core power, Wi-Fi, and Bluetooth without hiccups. Whether you’re blinking an LED or streaming data to the cloud, they’ve got the stability to keep your projects humming along smoothly.
3 – Differences between these two boards
While both boards are excellent choices, there are a few key differences you should be aware of:
3.1 – Built-In LED
One noticeable difference is that the DOIT ESP32 DevKit V1 board comes equipped with a small, programmable LED directly on the board. This might seem like a minor feature, but it’s incredibly useful when you’re just starting out. You can use this on-board LED to test simple code, blink it to indicate different states, or use it for basic output without needing to connect any external components. The ESP32 DevKitC V4 board does not have this built-in LED.
3.2 – Access Official Resources with Espressif’s Board
The ESP32 DevKitC V4 holds a special distinction as it was designed by Espressif Systems themselves – the very company that created the ESP32 microcontroller. This makes it one of the “official” development boards for the ESP32 platform. A significant benefit of this is that you can access a wealth of resources, including detailed hardware design files and comprehensive documentation, directly from Espressif’s official website. You can find these resources here: https://www.espressif.com/en/products/devkits/esp32-devkitc/resources. This direct link to the source can be very helpful for deeper technical understanding.
3.3 – 30 Pin and 36 Pin Version
It’s worth noting that both the ESP32 DevKitC V4 board and the DOIT ESP32 DevKit V1 board are commonly available in two versions: one with 30 pins and another with 36 pins. For the vast majority of our tutorials at AvantMaker.com, either the 30-pin or the 36-pin version of either board will be perfectly suitable. The core functionalities and pinouts relevant to our learning materials remain consistent across these variations. So, don’t worry too much about the specific pin count when making your choice for our tutorials.
4 – Development Board Variations
Since both the ESP32 DevKitC V4 and the DOIT ESP32 DevKit V1 are open-sourced designs, various manufacturers produce boards based on these specifications. This means you might encounter boards that look slightly different or have minor variations in their components.
These variations can include differences in components like the voltage regulator (which ensures the board receives the correct power), the UART chip (responsible for communication over USB), the type of USB connector (Micro-USB or USB-C), and even the labeling of the pins. However, despite these small differences in the underlying hardware, all boards that identify themselves as either an ESP32 DevKitC V4 or a DOIT ESP32 DevKit V1 should function very similarly.
Unless we specifically point out a particular requirement or incompatibility in one of our tutorials, you can generally assume that any board claiming to be an ESP32 DevKitC V4 or a DOIT ESP32 DevKit V1 will be compatible and applicable to our learning materials. We strive to ensure our tutorials are as broadly applicable as possible to these common and popular board designs.
5 – Getting Started with Your Board
Ready to dive in? Whichever board you pick, the first step is simple: plug it into your computer with a USB cable. You’ll likely need to install drivers for the USB-to-serial chip (check the vendor’s site or our tutorials for links). Then, grab a development tool like the Arduino IDE, select your board (DOIT ESP32 DevKit V1 or ESP32-DevKitC), and start coding. Our tutorials walk you through this setup, so you’re never flying blind. It’s like building a model kit—follow the steps, and you’ll have something cool in no time.
To access our ESP32 Tutorials, plese checkout the following link:
AvantMaker.com ESP32 Tutorials
Conclusion
The ESP32 DevKitC V4 and DOIT ESP32 DevKit V1 are your perfect partners for exploring the ESP32 universe. They’re beginner-friendly, budget-savvy, and backed by a thriving community—everything you need to turn your ideas into reality. At AvantMaker.com, we’re here to guide you every step of the way.
Head over to our All About ESP32 page for tutorials, references, and more to kickstart your journey. Grab a board, fire up your creativity, and let’s make something awesome together!