Category: ESP32

  • ESP32-WebFS: Simplifying SPIFFS File Management for Your ESP32 Projects

    ESP32-WebFS: Simplifying SPIFFS File Management for Your ESP32 Projects

    Introducing ESP32-WebFS

    If you’ve ever worked with an ESP32 microcontroller, you’ve likely come across SPIFFS—short for Serial Peripheral Interface Flash File System. It’s like a tiny digital filing cabinet built into your ESP32, perfect for storing files like web pages, sensor data, or configuration settings. For makers, SPIFFS is a game-changer because it lets your projects do more—like serving up a webpage or saving logs—without needing extra hardware.

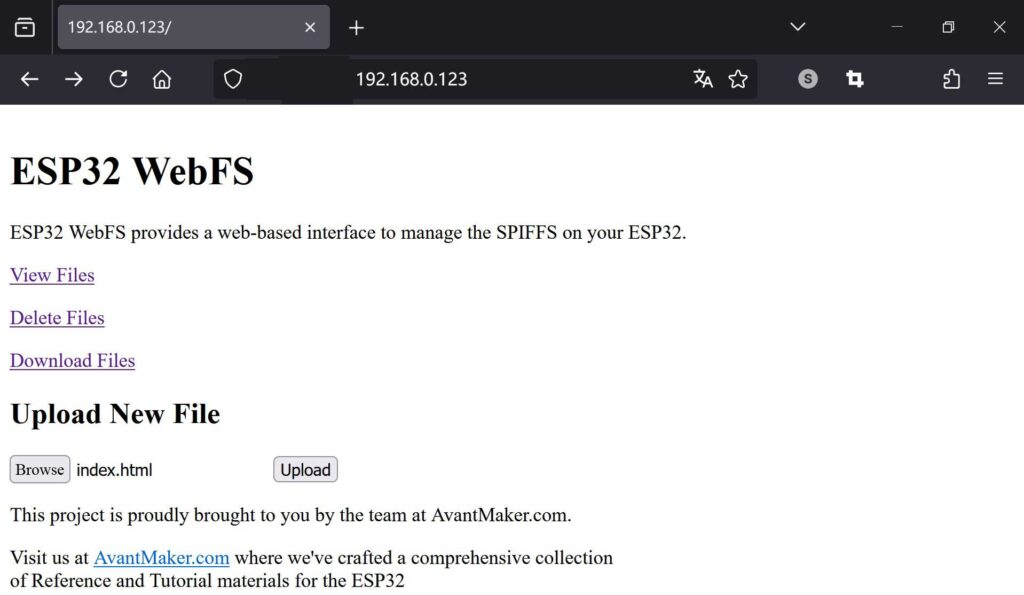
    ESP32 WebFS Web Interface Screenshot

    Enter ESP32-WebFS, a fresh tool from the AvantMaker Team. It turns your ESP32 into a web server with a simple but not simplistic interface, making it a breeze to upload and manage files on SPIFFS. No more fumbling with complicated setups—just a straightforward way to keep your projects organized. Best of all? It’s open-source under the MIT license. That means it’s free to use, modify, and share, with no hidden costs or restrictions. The MIT license is a promise that this tool is yours to explore, hassle-free.

    Why We Created ESP32-WebFS

    Let’s face it: managing files on an ESP32’s SPIFFS can feel like trying to herd cats. Normally, you’d need to hook up your board, use specific software, and sometimes even dig into command-line tools to get files where they need to be. It’s time-consuming, error-prone, and not exactly beginner-friendly. We’ve been there, and we knew there had to be a better way.

    That’s why we at AvantMaker built ESP32-WebFS. Our goal was simple: take the headache out of uploading and managing SPIFFS files. With this tool, you can handle everything through a web browser, cutting out the extra steps and letting you focus on what matters—building cool projects.

    What ESP32-WebFS Brings to the Table

    ESP32-WebFS comes packed with features designed to simplify your workflow:

    • Web-Based File Management: Upload, delete, download, view files on SPIFFS using a simple browser interface—no extra software needed.
    • Easy Setup: Get started fast—just update the Wi-Fi credentials in the sketch, upload it to your ESP32, and your board is ready to roll.
    • Real-Time Feedback: See what’s happening with your files as you work, with updates right on the screen.
    • Lightweight Design: It’s built to run smoothly on the ESP32 without eating up all your memory or processing power.
    • Customizable Code: Since it’s an Arduino sketch, you can tweak it to fit your project’s needs.

    Practical Use Cases:

    • Remote Configuration: Easily update configuration files for your IoT devices deployed in hard-to-reach locations without physical access.
    • Data Logging Retrieval: Wirelessly download sensor data logs stored on the ESP32 SPIFFS for analysis and visualization.
    • Custom Web Interface Updates: Quickly update the HTML, CSS, and JavaScript files for your ESP32-powered web applications.

    Where to Grab ESP32-WebFS

    Ready to experience the ease of managing your ESP32’s SPIFFS files? ESP32-WebFS is now available on the AvantMaker GitHub repository! Head over to the link below to get the code and start using it in your projects:

    https://github.com/AvantMaker/ESP32-WebFS

    It’s all there, free and open for you to explore. Since it’s open-source, we’d love to hear your feedback or see your contributions—feel free to fork the project and share your ideas to make it even better!

    Setting Up and Using ESP32-WebFS: A Quick Guide

    Prerequisites:

    • An ESP32 development board
    • The Arduino IDE installed with the ESP32 board support package
    • Basic knowledge of the Arduino IDE
    • A Wi-Fi network

    Getting started with ESP32-WebFS is straightforward. You’ll essentially upload the provided Arduino sketch to your ESP32. The sketch can be configured to connect to your existing Wi-Fi network (Station mode) or to create its own Wi-Fi network that you can connect to (Access Point mode). Once running, your ESP32 will host a web server. You can then connect to the ESP32’s web server using any web browser on your computer or smartphone and start managing your ESP32 SPIFFS files.

    For a more detailed step-by-step guide, including configuration options for network settings and advanced features, we encourage you to check out the comprehensive user manual located in the doc folder of the GitHub repository. You can find it here:

    ESP32-WebFS User Manual

    Looking Ahead: More ESP32 Resources from AvantMaker

    At AvantMaker.com, we are passionate about empowering the maker community. The release of ESP32-WebFS is just one step in our ongoing efforts to provide valuable resources for your ESP32 projects. We are actively working on creating more tutorials, reference materials, and exciting tools to help you unlock the full potential of this versatile microcontroller. So, make sure to visit our website regularly for the latest updates and inspiring content.

    As an open-source project, we also welcome contributions from the community! If you have ideas for improvements or find any issues, please feel free to contribute on our GitHub repository.

    If you have any questions, feedback, or just want to connect with us, feel free to reach out through AvantMaker Website’s About Page.

    Happy Making!

  • New ESP32 LittleFS Tutorial Article Released!

    New ESP32 LittleFS Tutorial Article Released!

    Are you looking to expand the capabilities of your ESP32 projects? Do you want to store web pages, images, or sensor data directly on your ESP32’s SPI Flash? Then this tutorial is for you!

    In this comprehensive guide, we walk you through the process of uploading files to the ESP32’s SPI Flash Memory using the LittleFS file system. We cover everything from understanding SPI Flash and why LittleFS is superior to SPIFFS, to step-by-step instructions on setting it up in the Arduino IDE.

    What You’ll Learn:

    • Understanding ESP32 SPI Flash Memory.
    • Why LittleFS is the best choice for modern ESP32 projects.
    • Installing the LittleFS Uploader plugin in Arduino IDE.
    • Preparing and uploading files to your ESP32.
    • Verifying your uploads with a practical web server example.

    Whether you’re a beginner or an experienced maker, this guide will equip you with the knowledge and skills to leverage the full potential of your ESP32 projects.

    Read the full article: Mastering File Uploads to ESP32 SPI Flash with LittleFS: A Maker’s Guide

    At AvantMaker.com, we’re dedicated to empowering makers, learners, and enthusiasts with the resources they need to bring their innovative ideas to life. Explore our growing library of tutorials and reference materials for ESP32, Arduino, IoT, and more!

    Happy making!

  • Expand Your ESP32 Knowledge: New Network Tutorials Added to Our Essential Guide!

    Expand Your ESP32 Knowledge: New Network Tutorials Added to Our Essential Guide!

    We’re excited to announce that we’ve just added new tutorial articles to our ESP32 Essential Guide! If you’re looking to master the networking capabilities of your ESP32, you’re in the right place.

    These new additions focus on the crucial network section of the ESP32, specifically diving deep into WiFi functionalities. Whether you’re a beginner looking to connect your ESP32 to a wireless network or an experienced maker wanting to explore advanced WiFi features, these tutorials provide clear, step-by-step instructions and practical examples.

    What can you expect to learn?

    • Setting up WiFi connections: Learn how to connect your ESP32 to various WiFi networks.
    • Understanding WiFi modes: Explore different WiFi modes and their applications.
    • Practical examples: Follow along with real-world scenarios and code snippets to solidify your understanding.

    We’ve designed these tutorials to be easy to follow, ensuring you can quickly grasp the concepts and apply them to your projects.

    Ready to dive in? Check out the new network section and WiFi chapter of our ESP32 Essential Guide here:

    ESP32 Essential Guide: Network Section – WiFi Chapter

    But that’s not all! We’re constantly working on expanding our ESP32 Essential Guide with more in-depth tutorials and practical examples. Stay tuned for future updates as we continue to add new content covering various aspects of the ESP32 ecosystem.

    We believe in empowering makers with the knowledge and tools they need to bring their ideas to life. Keep an eye on AvantMaker.com for more exciting tutorials and resources. Happy making!


  • CA Certificates, Client Certificates, and Private Keys: Your Network’s Bouncers

    CA Certificates, Client Certificates, and Private Keys: Your Network’s Bouncers

    Hey there, makers, tinkerers, and curious minds! If you’ve ever hooked up an IoT gadget, built a DIY server, or dabbled in AI projects, you’ve probably stumbled across terms like “CA Certificate,” “Client Certificate,” and “Private Key.” They sound like the secret ingredients to a tech potion, don’t they? Well, they kind of are! These armored guardians of secure network communication keep your data safe from prying eyes. Let’s break them down in a way that won’t make your brain feel like it’s rebooting.

    What Are These Things, Anyway?

    Picture the internet as a bustling marketplace. You’re selling your latest 3D-printed gizmo, and someone wants to buy it. But how do you know they’re legit—and how do they know you’re not a shady bot? That’s where our crypto trio comes in. They’re like the bouncers, ID cards, and secret handshakes of the digital world.

    CA Certificate: The Trusty Referee

    First up, the CA Certificate—or Certificate Authority Certificate. This is issued by a Certificate Authority (CA), a fancy name for an organization that’s basically the internet’s hall monitor. Companies like DigiCert or Let’s Encrypt are CAs, and they vouch for websites or devices by handing out digital “trust badges.” When you visit a site with “https” in the URL, your browser checks the CA Certificate to confirm, “Yup, this site is who it says it is.” No CA Certificate? It’s like showing up to a party without an invite—everyone’s suspicious.

    Client Certificate: Your Digital Passport

    Next, the Client Certificate. This one’s all about you (or your device) proving your identity. Think of it as your VIP pass to a secure server. When your IoT temperature sensor wants to send data to a cloud platform, the server might say, “Hold up, show me your ID!” The Client Certificate steps in, saying, “Here’s my name, my credentials, and proof I’m not a random hacker.” It’s signed by a CA, so the server knows it’s not just a doodle you made in Paint.

    Private Key: The Secret Decoder Ring

    Finally, the Private Key. This is the super-secret half of a key pair (the other half is the public key, but more on that in a sec). The Private Key is like the combination to your personal safe—it’s yours alone, and you never share it. When you send encrypted data, the Private Key locks it up tight. Only someone with the matching public key can unlock it, and vice versa. Lose this key, and you’re basically handing your safe’s combo to a stranger. Guard it like it’s the last slice of pizza at a maker meetup.

    Why Do They Matter?

    Okay, so we’ve got our trio: the referee, the passport, and the decoder ring. But why should you care? Let’s say you’re building a smart doorbell with a camera. You want it to send video feeds to your phone without some creep intercepting them. Or maybe you’re running an AI model on a Raspberry Pi that talks to a remote server. Without secure communication, your data’s as exposed as a cardboard robot in a rainstorm.

    Here’s how they team up:

    • The CA Certificate ensures the server you’re talking to isn’t a fake. No one wants their doorbell chatting with a scammer’s impostor site.
    • The Client Certificate proves your device is legit, so the server doesn’t slam the door in its face.
    • The Private Key scrambles your data, keeping it safe from anyone snooping on the network—like that nosy neighbor who always wants to know what you’re building.

    Together, they create a secure handshake. The server trusts your device, your device trusts the server, and your data stays locked up tighter than a vault. This is called mutual TLS (Transport Layer Security), and it’s the gold standard for keeping networked projects safe.

    Real-World Maker Magic

    Let’s get practical. Suppose you’re setting up an IoT weather station. You generate a Private Key and a Client Certificate for your device, signed by a CA. The server you’re sending data to has its own CA Certificate. When your station reports that it’s 72°F and sunny, the Private Key encrypts the message, the Client Certificate proves it’s really your station, and the CA Certificate confirms the server isn’t a weather-data-stealing impostor. Result? Your app gets the update, and no one else does.

    Without these, your weather station might as well be shouting your data through a megaphone. Hackers could spoof your server, steal your info, or even send fake readings to make you think it’s snowing in July. Not cool.

    Wrapping It Up

    CA Certificates, Client Certificates, and Private Keys might sound like a techy tongue twister, but they’re the unsung heroes of secure communication. For makers like us, they’re the difference between a project that works safely and one that’s a free-for-all for digital troublemakers. So next time you’re wiring up that DIY gadget or coding an AI bot, give a little nod to this trio—they’ve got your back.

    Happy making!

  • Creating Your Own Private Key and Certificate: It’s Easier Than You Think!

    Creating Your Own Private Key and Certificate: It’s Easier Than You Think!

    Welcome, fellow tinkerers, to the wild world of digital security! If you’re building an IoT gadget, a DIY server, or just want to flex your maker muscles, you’ve probably stumbled across terms like “private key” and “certificate.” They sound like something out of a spy movie, but they’re actually the unsung heroes keeping your projects safe from digital ne’er-do-wells. Today, we’re diving into how to create them—without needing a PhD or a secret handshake.

    What Are We Even Talking About?

    A private key and certificate are like the lock and key to your digital front door. The private key is your super-secret code—guard it like it’s the last slice of pizza at a party. The certificate, on the other hand, is a public badge of trust, signed by someone (or something) saying, “Yep, this is legit.” Together, they’re the backbone of secure communication, whether it’s your Raspberry Pi talking to a server or your AI bot chatting with the cloud.

    Think of it like this: the private key is your house key, and the certificate is the note from your locksmith proving it’s yours. Without both, you’re either locked out or looking sketchy to your neighbors.

    Why Bother Making Your Own?

    Sure, you could buy a certificate from a fancy authority or use someone else’s setup, but where’s the fun in that? Creating your own gives you control, saves a few bucks, and lets you say, “I built this!” when your smart toaster starts chatting securely with your phone. Plus, for testing or personal projects, self-made keys and certificates are more than enough—no need to call in the big guns.

    Tools of the Trade

    For this adventure, we’ll use OpenSSL—a free, open-source tool that’s like the Swiss Army knife of cryptography. It’s available for Windows, Mac, and Linux, so no excuses! If you don’t have it yet, grab it from your package manager (like apt install openssl on Linux) or download it from openssl.org. Got it? Great, let’s roll.

    Step 1: Crafting Your Private Key

    First up, the private key. Open your terminal—yes, that black box with the blinking cursor—and type this:

    openssl genrsa -out myprivatekey.pem 2048

    What’s happening here? You’re telling OpenSSL to generate a shiny new RSA private key with 2048 bits of strength (big enough to keep the baddies out) and save it as myprivatekey.pem. That “.pem” part? It’s just a file format, like .jpg for cat pics. You’ll see a bunch of gibberish in that file—don’t panic, it’s supposed to look like that.

    Pro Tip: Keep this file safe. If someone snags it, they’ve got the keys to your kingdom. Maybe don’t store it next to your Wi-Fi password on a sticky note.

    Step 2: Making a Certificate Signing Request (CSR)

    Next, we need to ask for a certificate. Think of this as filling out a form to prove who you are. Run this command:

    openssl req -new -key myprivatekey.pem -out myrequest.csr

    OpenSSL will ask you some questions—like your country, name, and project name. You can mash “Enter” for defaults if it’s just for testing, or get fancy and fill it out. This spits out a myrequest.csr file, which is your formal request for a certificate.

    Step 3: Signing Your Own Certificate

    Since we’re DIY-ing this, you’ll be your own certificate authority (CA). It’s like declaring yourself mayor of your own little digital town. Use this command:

    openssl x509 -req -days 365 -in myrequest.csr -signkey myprivatekey.pem -out mycertificate.crt

    Breaking it down: you’re signing your request with your private key, making a certificate (mycertificate.crt) that’s good for 365 days. Boom—you’ve got a certificate! It’s self-signed, so it won’t impress Google, but it’s perfect for your IoT weather station or AI-powered dog feeder.

    Putting It to Work

    Now what? Slap that private key and certificate onto your project. If you’re running a web server on a Raspberry Pi, drop them into the config files (like Nginx or Apache). Testing an IoT device? Load them into your code. Your devices will now whisper sweet, encrypted nothings to each other, safe from prying eyes.

    Not sure how to use them? Check your project’s docs—every setup’s a little different, like snowflakes or badly assembled IKEA furniture.

    A Word of Caution

    Self-signed certificates are awesome for personal projects, but if you’re going public—like hosting a website for your smart coffee maker empire—browsers might throw a tantrum and show a “Not Secure” warning. For that, you’ll need a certificate from a trusted authority. But for tinkering? You’re golden.

    Wrap-Up

    And there you have it, makers! You’ve just whipped up a private key and certificate faster than you can say “soldering iron.” With these in your toolkit, you’re ready to secure your DIY creations and keep the digital gremlins at bay. Got questions? Drop them in the comments below—we’re here to help you turn ideas into reality, one secure byte at a time.

    Happy making!

  • Level Up Your IoT Security: Server Authentication vs. Mutual Authentication

    Level Up Your IoT Security: Server Authentication vs. Mutual Authentication

    In the world of IoT and secure communication, understanding different levels of security is crucial, especially when you’re building projects that handle sensitive data. When it comes to secure connections for your ESP32 projects, you’ll often hear about “Server Authentication” and “Mutual Authentication.” But what do these terms really mean, and how do they impact the security of your DIY creations? Let’s break it down in a way that’s easy for every maker to grasp!

    What is Secure Connection and Why Does it Matter?

    Imagine sending a secret message. You wouldn’t want just anyone to read it, right? Secure connections are like using a secret, encrypted tunnel for your data to travel through the internet. This encryption keeps your data safe from prying eyes, ensuring that only the intended recipient can understand it. This is super important for IoT projects that might be sending sensor data, controlling devices, or handling any kind of personal information.

    Server Authentication: “Is This Website Really Who It Says It Is?”

    Server authentication is the most common type of secure connection you encounter every day, especially when you Browse websites using HTTPS. Think of it as the website proving its identity to your computer or ESP32.

    Here’s how it works in simple terms:

    1. The Server Shows its ID: When your ESP32 tries to connect to a server (like a website), the server presents a digital “ID card” called a certificate.
    2. Checking the ID with a Trusted Source: Your ESP32 then checks this “ID card” with a list of trusted sources (Certificate Authorities or CAs). Think of CAs as organizations that are globally trusted to verify digital IDs. In our ESP32 code examples, we use a “Root CA Certificate” – this is like giving your ESP32 the list of trusted sources.
    3. Secure Tunnel Established if ID is Valid: If the “ID card” is valid and from a trusted source, your ESP32 knows it’s very likely talking to the real server. It then creates a secure, encrypted tunnel to exchange data.

    Key Security Benefits of Server Authentication:

    • Confidentiality: Your data is encrypted, so eavesdroppers can’t read it.
    • Integrity: Ensures that the data isn’t tampered with during transmission.
    • Server Authenticity: You can be reasonably confident you’re talking to the real server and not a fake one trying to steal your information.

    Analogy: It’s like visiting a government office. You want to make sure you’re actually at the official building and not some imposter’s location. Server authentication helps you verify that the “building” (server) is legitimate.

    Mutual Authentication: “Let’s Both Show Our IDs!”

    Mutual authentication takes security a step further. In this method, both the server and the client (your ESP32) have to prove their identities to each other using certificates. It’s like a two-way ID check.

    Here’s how it works:

    1. Server Shows ID (Certificate): Just like in server authentication, the server presents its certificate, and the ESP32 verifies it.
    2. ESP32 Also Shows ID (Client Certificate): Now, the ESP32 also presents its own digital “ID card” – a client certificate – to the server.
    3. Server Checks ESP32’s ID: The server checks if the ESP32’s client certificate is valid and from a trusted source (or matches a pre-approved list).
    4. Mutual Trust, Secure Tunnel: Only if both IDs are verified does the secure connection fully establish. Now, both sides are sure about each other’s identity, in addition to having a secure, encrypted channel.

    Added Security Benefits of Mutual Authentication:

    • All benefits of Server Authentication: Confidentiality, integrity, and server authenticity.
    • Client Authenticity: The server is now also sure it’s talking to a trusted and authorized client (your ESP32). This prevents unauthorized devices from connecting to the server.

    Analogy: Imagine entering a super-secret lab. Not only do you need to verify you are at the correct lab (like server authentication), but you also need to show your special lab access badge (client certificate) to prove you are allowed inside. Only then are you granted full access.

    Server vs. Mutual Authentication: Which is More Secure?

    Mutual authentication is more secure because it adds that extra layer of client verification. It’s like having double-locked doors instead of just one.

    Why don’t all servers require client certificates then?

    • Complexity: Setting up and managing client certificates for many users or devices can be complicated. Imagine issuing and managing “lab access badges” for thousands of people!
    • Usability: For general websites, requiring client certificates would be a hassle for everyday users. Server authentication is often enough for typical web Browse and online shopping.
    • Overhead: Mutual authentication can add a bit more processing overhead to the connection process.
    • Security Needs: For many applications, server authentication provides a good balance of security and practicality. Mutual authentication is usually reserved for situations with very high security demands.

    When Should You Use Mutual Authentication for Your IoT Projects?

    Consider using mutual authentication in your IoT projects when:

    • Dealing with Highly Sensitive Data: If your project handles personal, financial, or critical operational data.
    • Strict Device Authorization is Needed: You need to absolutely ensure that only your authorized ESP32 devices can connect to your server or system.
    • Machine-to-Machine Communication in Critical Infrastructure: For industrial automation, smart grids, or healthcare applications where unauthorized access could have serious consequences.

    For many maker projects, especially those for learning and experimentation, server authentication using Root CA certificates provides a strong level of security for data transmission. However, understanding mutual authentication is essential as you tackle more advanced and security-sensitive IoT applications.

    Level Up Your Security Knowledge!

    Understanding the difference between server and mutual authentication is a great step towards building more secure and robust IoT projects. As you continue your maker journey, always think about security best practices to protect your creations and your users. Explore more security features of the ESP32 and keep innovating safely!

  • Why We Call It the “WiFiClientSecure Library”

    Hey, makers, tinkerers! Welcome to AvantMaker.com, your go-to spot for all things DIY, AI, IoT, Smart Home, and STEM. Today, we’re pausing the soldering irons to tackle a tiny question you might’ve had: why do we call it the “WiFiClientSecure Library”? Spoiler: it’s not technically a library. Cue the suspenseful violin sting!

    The Geeky Lowdown

    Let’s nerd out for a sec. In the ESP32 Arduino core, there’s a library folder called NetworkClientSecure. Inside that lives a class—also named NetworkClientSecure—which gets a snazzy alias: WiFiClientSecure. So, yep, WiFiClientSecure is a class, not a library. Meanwhile, stuff like the WiFi library, HTTPClient library, and even good ol’ WiFiClient library? Those are all called libraries too, even though they’ve got classes inside them—like WiFiClassHTTPClient, and WiFiClient. Confused? Don’t be. When you’re coding your ESP32 to chat securely with the internet (hello, TLS/SSL superpowers!), you’re slapping #include <WiFiClientSecure.h> into your sketch and rolling with WiFiClientSecure client;. No one’s chanting “NetworkClientSecure” like it’s a secret code.

    Why “Library” Feels Right

    So why slap “library” on WiFiClientSecure? Because that’s how the maker world rolls! When you’re elbow-deep in a project, you’re not pondering, “Ah, the NetworkClientSecure class.” Nope, you’re searching “WiFiClientSecure tips” and calling it a day. Same deal with the WiFi library, HTTPClient library, and the rest—they’re all dubbed “libraries” in tutorials and coffee-fueled forum posts. It’s like calling your favorite snack “chips” instead of “crispy potato slices.” Technically, there’s a difference, but who cares when it tastes good?

    Are We Just Winging It?

    Not at all—we’re just keeping it chill. Here at AvantMaker.com, we’re all about making tech fun, not a yawn-inducing textbook chapter. If we hit you with “NetworkClientSecure Library” every time, you’d think we’re trying to sound like tech snobs (and nobody’s got time for that). The maker crowd calls it the “WiFiClientSecure Library”—from YouTube gurus to late-night Reddit rants—and we’re sticking with the people’s choice. Sure, the nitpickers out there might smirk and mutter, “Um, actually, it’s a class.” To them, we tip our hats: Well played, you eagle-eyed genius. But for the rest of us, “library” keeps it simple and snappy.

    Does It Even Matter?

    Whether you’re building a smart light or a plant-watering gizmo, the “WiFiClientSecure Library” is your buddy for locking down those connections. Call it a class, a library, or “that thing that keeps my data safe from sketchy Wi-Fi”—it’s the same trusty tool. So don’t sweat the label. We’re here to help you create awesome stuff, not to spark an existential crisis over naming conventions.

    Let’s Call It a Day

    At AvantMaker.com, we’re cheering for every maker—newbies, pros, and everyone who’s ever burned a finger on a hot glue gun. The “WiFiClientSecure Library” is just one piece of the puzzle to spark your next big thing. So grab your ESP32, code something epic, and don’t overthink the small stuff. We’ll keep shouting “library” from the rooftops—and maybe mumble “NetworkClientSecure” under our breath when the nerd police aren’t listening. Deal?

    Now, quit reading and start building—your masterpiece won’t invent itself!

error: Content is protected !!